Wednesday, June 5, 2013

Hallo every one today I am giving you a tips to create a excellent test effect... like bellow....


Is not it amazing.................?
OK lets start..

1) Run your adobe photoshop 7.0 > open a new file that showing below...


2) Now fill the background with black > select text tool then change that shoes below....


 3) Write something then select move tool > press "ctrl + t " > move and re-size the text. Now follow the next photos commands.....


4) Now go to filter and do that....


5) Press OK then do this.....


6) Now press " ctrl + f " 3 times then follow the next photo commands...


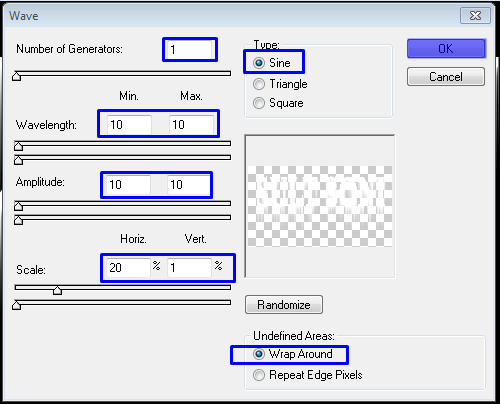
7) Go to the filter menu again then do that.....


8) Now edit the blue markings like the nest photo then press OK....


9 Now select the background color red then follow the next photos commands.....


10) Now edit the blue markings like the next photo then press OK...


OK 
You done
enJoy

I will try to upload more tips next time...

 
Thanks all to view
Bye Bye..


Thursday, May 30, 2013

Hello today I am showing a abstract text effect. I am sure that you must like this tutorial....
OK lets come with me.......


Actually its a large work but I was trying to make it short as possible....
OK lets start...
1) Run Adobe Photoshop > open new file like shows below...


2) press "t" to select text tool > modify text front, style and color > write what you want to write > click on the move tool....cant understand see the next photo....


3) press " Ctrl+ t" to modify test size and position then press " Enter "
4) now follow the next photo commands.....

 5) press " Ctrl+ j" to duplicate the layer > press " Shift + F5 " and follow the next 8 photos commands....


6) did you done ? OK now press " Ctrl + f" once. > press " Shift+ Ctrl + L" > press "Ctrl + i " > press " Ctrl + F " twice .
7)  Good . .. Now follow the next photos commands .....


Thanks all '
If you like or Dislike please comments
I will upload more tutorial next time till then
bye bye....


Tuesday, May 28, 2013

Hallo dear, I was ill last few days so I cant upload any tips for you...
Today I am showing you a tips about text effect on Adobe Photoshop...
Just look...


1) Run Adobe  Photoshop> create a new file like below...


2) Fill the layer with black. To fill the layer just choose foreground color  black then press " Shift+ F5" then Enter.
3) Now select Text tool and  write some thing on the layer . EX. I write here Sult Soni using color red.


4) Now select the text by Magic Wand Tool. ( Press "w" to select Magic Wand Tool > press and hold Shift key then click on every latter.)


5) After selecting the text press " Ctrl+ Alt+ D " to open Feather menu then follow the photo command ...


 6) Go to Filter menu and follow the next photo commands....


 7) Now to increase the effect press " Ctrl + F" then to inverse the selection press " Shift + Ctrl + I " then press " ctrl + F " again. you will get a image like this...


8) now follow the next 4 photo commands ... To make your text more .....


 Thanks  all
If you like or dislike that please Comments..
 Bye......


Friday, May 17, 2013

Hallo , today I'm showing you to make a abstract background that showing below....


1) Run adobe Photoshop
2) Open a new file like this....


3) Now follow the photo instructions .....


4) Now save this file as jeg and close it.
5) Open a new file same of the first file then create a new layer. then select Gradient tool and follow the photo instructions below...


6) Place the every color @ 15% distence.

7) Now press and drug the carter from middle of the image to right  as shown the next photo


  8) Now go to the filter menu and do like that...


9) Now create a new layer > select foreground color Black > fill the new layer by pressing " shift + F5 " then OK.

10) Now Create another layer and open the file that saved the first step. Then select the Magic tool select the love image. Then Drug that from one to another... like shows below.....


11) Now close the file . Then go to edit menu and do like the next two photos...


12)  Now delete the layer then press  'Ctrl+ D " to deselect.
13) Now press "F5 " and follow the nest photo instructions


15) Now drug and move the carter you will gate the following image.

Thanks all for visite
Next time i will show more amazing   tips
BYE...