 RSS Feed
 Twitter
 4:17 AM
 Sult Soni
Hello every body. Today I am uploading a exciting text effect tutorial...

Do you want to draw it............
Ok lets start...
1) Run your adobe Photoshop soft then open a new document like shows below...

2) Now select the Gradient tool then follow the next photos commands...


3) Now create a new layer then select the Text tool and choose text front as you like. Now type 'S' then select the Move tool > press " Ctrl+ T" then to modify size and move the text as needed .
4) Create another layer > select text tool again then type " ult " and do the same to no. 3.
5) Create another layer > select text tool then type " oni " and do the same work like no. 3
After doing that your photo will be like that.....

6) Now select the layer that contain the later "S" then follow the next photos command carefully...
when modify color it shows by red text on the photos


The color code of the next photo is # 9D824F


7) After followed all the commands you will get a exciting text effect on the latter "S" . Now right click on the layer "s" in layer palate then copy the layer style > then right click on the layer "ult" and "oni" one by one and past the layer style as shown below....


8) You can change the different Pattern Overlay for different layer. to do this, you have to select the layer then go to Layer menu > Layer style > Blending Options, and follow the next photos...

9) pess Ok and choose ant pattern that you like...
Here is another style....

Thank you all to visit here I will Upload more tutorial next time till then
Bye Bye..

Do you want to draw it............
Ok lets start...
1) Run your adobe Photoshop soft then open a new document like shows below...

2) Now select the Gradient tool then follow the next photos commands...


3) Now create a new layer then select the Text tool and choose text front as you like. Now type 'S' then select the Move tool > press " Ctrl+ T" then to modify size and move the text as needed .
4) Create another layer > select text tool again then type " ult " and do the same to no. 3.
5) Create another layer > select text tool then type " oni " and do the same work like no. 3
After doing that your photo will be like that.....

when modify color it shows by red text on the photos


The color code of the next photo is # 9D824F


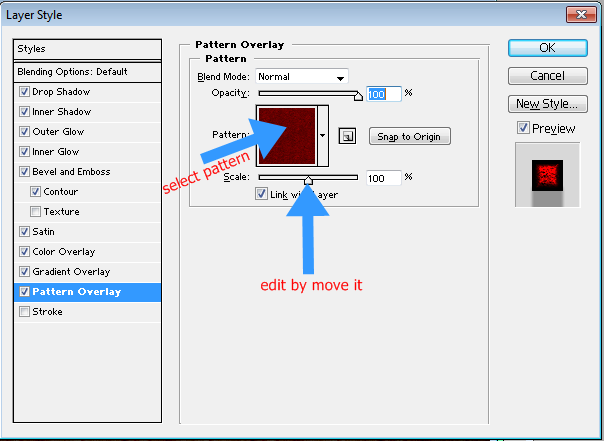


8) You can change the different Pattern Overlay for different layer. to do this, you have to select the layer then go to Layer menu > Layer style > Blending Options, and follow the next photos...

9) pess Ok and choose ant pattern that you like...
Here is another style....

Bye Bye..


